How to add adsense inside blogger post

2 Comments
Capture
Your adsense revenue is too less ?? here is the solution. Adding AdSense inside blogger post is the smart way to increase the visibility to get more clicks. If you add AdSense inside blogger post then ad visibility will increase and also your clicks will increase and your earning will also increase. So adding the adsense inside blogger post is the grate idea to earn more dollars from your blog.

More Ad Visibility = More Clicks = More Revenue
Follow the simple steps to add AdSense inside blogger post.
1.We have to parse our AdSense code (parse it here)

2.Now add your parsed AdSense code here
<b:if cond='data:blog.pageType == "item"'>  
your adsense code here   </b:if>  
If you want to add AdSense in left side of the blogger post.
<b:if cond='data:blog.pageType == "item"'>  
<div style="float:left;">
your adsense code here  </div>
</b:if>  
If you want to add AdSense in right side of the blogger post.
<b:if cond='data:blog.pageType == "item"'>  
<div style="float:Right;">
your adsense code here  </div>
</b:if>  
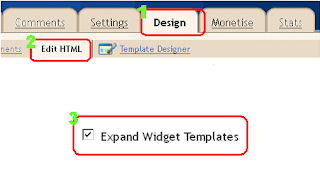
3.Now go to Edit HTML and select “expand widget template”
4.Now search for (ctrl+F) <data:post.body/> (if you are using magazine type blogger template then you may found more then 1 <data:post.body/> try both and see which is correct one) and paste your code above it if you want to show ad at the top of the post else paste your code bellow <data:post.body/> to show your ads bellow the blogger post.

Sexy Drop Down Menu For Blogger Blog

1 Comment

This widget is simple, cool with a fantastic appearance and the advantage of this widget are it doesn't contain any jQuery or JavaScript like language.  It loaded very fast as it contain no images.  This amazing drop down menu is created by Catalin Rosu. I am sharing a modified version which will work perfectly with Blogger. It is really a cool widget which will give an creative and professional look to your Blog. I make its installation easy to every user so seat back smoothly and see the changes.

How to Add Drop Down Menu :-

  • In Blogger Dashboard Go to Edit HTML / Design.
  • Click on "Add a Gadget".
  • Choose HTML / JavaScript widget.
  • Paste the Following code inside it.
<style>
/*------ CSS3 Drop Down Menu By bit (www.moreforblogger.blogspot.com)---------*/
#bit-menu, #bit-menu ul {
margin: 0;
padding: 0;
list-style: none;
}
#bit-menu {
width: 960px;
margin: 60px auto;
border: 1px solid #222;
background-color: #111;
background-image: -moz-linear-gradient(#444, #111);
background-image: -webkit-gradient(linear, left top, left bottom, from(#444), to(#111));
background-image: -webkit-linear-gradient(#444, #111);
background-image: -o-linear-gradient(#444, #111);
background-image: -ms-linear-gradient(#444, #111);
background-image: linear-gradient(#444, #111);
-moz-border-radius: 6px;
-webkit-border-radius: 6px;
border-radius: 6px;
-moz-box-shadow: 0 1px 1px #777;
-webkit-box-shadow: 0 1px 1px #777;
box-shadow: 0 1px 1px #777;
}
#bit-menu:before,
#bit-menu:after {
content: "";
display: table;
}
#bit-menu:after {
clear: both;
}
#bit-menu {
zoom:1;
}
#bit-menu li {
float: left;
border-right: 1px solid #222;
-moz-box-shadow: 1px 0 0 #444;
-webkit-box-shadow: 1px 0 0 #444;
box-shadow: 1px 0 0 #444;
position: relative;
}
#bit-menu a {
float: left;
padding: 12px 30px;
color: #999;
text-transform: uppercase;
font: bold 12px Arial, Helvetica;
text-decoration: none;
text-shadow: 0 1px 0 #000;
}
#bit-menu li:hover > a {
color: #fafafa;
}
*html #bit-menu li a:hover { /* IE6 only */
color: #fafafa;
}
#bit-menu ul {
margin: 20px 0 0 0;
_margin: 0; /*IE6 only*/
opacity: 0;
visibility: hidden;
position: absolute;
top: 38px;
left: 0;
z-index: 9999;
background: #444;
background: -moz-linear-gradient(#444, #111);
background: -webkit-gradient(linear,left bottom,left top,color-stop(0, #111),color-stop(1, #444));
background: -webkit-linear-gradient(#444, #111);
background: -o-linear-gradient(#444, #111);
background: -ms-linear-gradient(#444, #111);
background: linear-gradient(#444, #111);
-moz-box-shadow: 0 -1px rgba(255,255,255,.3);
-webkit-box-shadow: 0 -1px 0 rgba(255,255,255,.3);
box-shadow: 0 -1px 0 rgba(255,255,255,.3);
-moz-border-radius: 3px;
-webkit-border-radius: 3px;
border-radius: 3px;
-webkit-transition: all .2s ease-in-out;
-moz-transition: all .2s ease-in-out;
-ms-transition: all .2s ease-in-out;
-o-transition: all .2s ease-in-out;
transition: all .2s ease-in-out;
}
#bit-menu li:hover > ul {
opacity: 1;
visibility: visible;
margin: 0;
}
#bit-menu ul ul {
top: 0;
left: 150px;
margin: 0 0 0 20px;
_margin: 0; /*IE6 only*/
-moz-box-shadow: -1px 0 0 rgba(255,255,255,.3);
-webkit-box-shadow: -1px 0 0 rgba(255,255,255,.3);
box-shadow: -1px 0 0 rgba(255,255,255,.3);
}
#bit-menu ul li {
float: none;
display: block;
border: 0;
_line-height: 0; /*IE6 only*/
-moz-box-shadow: 0 1px 0 #111, 0 2px 0 #666;
-webkit-box-shadow: 0 1px 0 #111, 0 2px 0 #666;
box-shadow: 0 1px 0 #111, 0 2px 0 #666;
}
#bit-menu ul li:last-child {
-moz-box-shadow: none;
-webkit-box-shadow: none;
box-shadow: none;
}
#bit-menu ul a {
padding: 10px;
width: 130px;
_height: 10px; /*IE6 only*/
display: block;
white-space: nowrap;
float: none;
text-transform: none;
}
#bit-menu ul a:hover {
background-color: #0186ba;
background-image: -moz-linear-gradient(#04acec, #0186ba);
background-image: -webkit-gradient(linear, left top, left bottom, from(#04acec), to(#0186ba));
background-image: -webkit-linear-gradient(#04acec, #0186ba);
background-image: -o-linear-gradient(#04acec, #0186ba);
background-image: -ms-linear-gradient(#04acec, #0186ba);
background-image: linear-gradient(#04acec, #0186ba);
}
#bit-menu ul li:first-child > a {
-moz-border-radius: 3px 3px 0 0;
-webkit-border-radius: 3px 3px 0 0;
border-radius: 3px 3px 0 0;
}
#bit-menu ul li:first-child > a:after {
content: '';
position: absolute;
left: 40px;
top: -6px;
border-left: 6px solid transparent;
border-right: 6px solid transparent;
border-bottom: 6px solid #444;
}
#bit-menu ul ul li:first-child a:after {
left: -6px;
top: 50%;
margin-top: -6px;
border-left: 0;
border-bottom: 6px solid transparent;
border-top: 6px solid transparent;
border-right: 6px solid #3b3b3b;
}
#bit-menu ul li:first-child a:hover:after {
border-bottom-color: #04acec;
}
#bit-menu ul ul li:first-child a:hover:after {
border-right-color: #0299d3;
border-bottom-color: transparent;
}
#bit-menu ul li:last-child > a {
-moz-border-radius: 0 0 3px 3px;
-webkit-border-radius: 0 0 3px 3px;
border-radius: 0 0 3px 3px;
}

</style>

<ul id="bit-menu"> 
<li><a href="#">Home</a></li> 
<li> 
<a href="#">Categories</a> 
<ul> 
<li><a href="#">CSS</a></li> 
<li><a href="#">Graphic design</a></li> 
<li><a href="#">Development tools</a></li> 
<li><a href="#">Web design</a></li> 
</ul> 
</li> 
<li><a href="#">Work</a></li> 
<li><a href="#">About</a></li> 
<li><a href="#">Contact</a></li> 
</ul>

  • Click Save and Enjoy.

4 Basic SEO Tricks For New Blogger

2 Comments
blog_seo_logo
If you are new in the blogging atmosphere and your blog doesn't have sufficient amount of traffic then you are at right place to improve blog traffic. 4 basic things, which I would like to share, should be properly kept in mind while writing a new post for your blog. You can get huge amount of traffic in a very short time period If you apply these killing SEO tips to your Blog. These tricks are very simple and everyone can easily apply. You may even get thousand of visitors over night in some cases.So lets start to apply these tricks on the Blog.

Basic SEO Tricks For New Blogger:-

Content Is More Important:-

Write_quality_content
First of all, keep it in mind that neither any search engine nor any SEO tricks will give you a instant traffic if your content don't follow these specification.
  • Content should be genuine. 
  • Frequency of posting a article should be constant.
  • It should not be copied from other sites.
  • Content should be according to your audience taste.
  • Always write lengthy article greater than 300 words.

Don't Forget About Heading Tag:-

H1_tag_most_important
Don't forget to include heading tag ( h1,h2,h3) at appropriate position in blog post. While <h1> tag is most important among all these tag and should be included in the document once. Don't use <h4>, <h5> and <h6> tag in the post.

Optimize Links And Images:-

Whenever there is necessity to use anchor tag <a> or image tag <img> in post then don't forget to add alt attribute under these tag as search engine like those content which have sufficient amount of anchor tag with useful alt keywords so always think about alt attribute before adding a anchor or image tag in post.

Importance Of Backlinks:-

increase_blog_backilinks


Backlinks, also known as Inbound links or Incoming links, are incoming links from another website,blog or web page to your site. Search engine spiders gives maximum priority to the content which have greater number of incoming links.Following point should be kept in mind while creating a backlink.
  • Before creating a backlink, be sure the site is a legitimate directory. 
  • Never use any script or software to create backlinks.
  • Don't use reciprocal linking means link to me and I will link to you. Exchanging reciprocal linking is violation of webmaster agreement.
Always remember that Incoming links from a website which have higher page rank will benefits you but on the other hand blacklisted website will heart your page rank. So avoid backlinks from gambling sites and adult entertainment like sites.

Templates based on Mashable Design

Be The First To Comment
Mash1:


Features:

  • Auto post Thumbnail at home page with read more.
  • Subscribe widget with Facebook and Twitter.
  • Floating social bookmarking widget what in Mashable
  • Facebook and Twitter counter share button on every post in the homepage
  • Top banner ad spot for 460×68
  • Two column navigation
  • Numbered page navigation
  • Trending post bar on the top of each post
  • Three column footer 
  • Right sidebar with one column at top and two at bottom.
  • Author info in each Post.
Odd's:
  • Header doesn't fit properly
  • Floating social bookmarking widget doesn't work quite well
  • Non Expandable Footer and may not fit for all gadgets.
  • Header doesn't fit properly

Mash2


Features: 
Same as Mash1, except
  • Top banner ad spot for 728×90
  • Latest post in big size (Inspired from Mashable)
  • Related post box at the end of every post

Odd's:
  • Larger ad spot made template more bulky and poor
  • Other bad feature of Mash1
Live Demo | Download


New Mashable


Features:

  • Auto post Thumbnail at home page with read more.
  • Facebook and Twitter counter share button on every post in the homepage
  • Banner ad spot for 728×90 at top of posts
  • Small link Navigator a top right corner.
  • Four column Footer
  • Email subscription
  • Facebook plugin at Home page
  • Default Blogger share buttons 
Odd's:
  • Search box is bulky and dirty in look.
  • No Floating bookmarking 
  • Right sidebar is not adequate.
  • Very short thumbnail post 
Live Demo | Download

Out of three I feel second one, Mash2 is far better than two of the other templates.I am also installed that template in this site. 

Check out and put your comment!

Top 30 Widgets For Blogger

Be The First To Comment


1. Previewit - Watch a thumbnail live preview of the link pointed out from your blog. Thumbnails appears on mouse hover on the outbound link.

2. Feedjit - Display Real time traffic data of your blog just in your blog sidebar.

3. Twitter Badge - Display a twitter badge on your blog.

4. Jaxtr - Allows your blog visitors to call your mobile number but your mobile number will be kept private.

5. 3Jam - Allows your blog visitors to send messages to your mobile phone without knowing your number.

6. Box storage - Allows your visitors to store data on box.com's storage service while staying on your blog.

7. Flixn - Displays a stream directly from your webcam so your blog visitors can always see what you are up to.

8. Showmyweather - A widget to Display weather stats of various countries.

9. TwentyFeet - A place to keep track of all your social stats and analytics.

10. ClockLink - A widget to show off time of various regions.

11. Skype - A widget that displays whether you are offline or online on Skype.

12. Feedcount - Show off the number of visitors to your blog.

13. Feedbuzz - Display headlines from your Rss Feed.

14. AnswerBox - A widget that allow users to search definition of a particular word and proudly powered by answers.com.

15. Timeline - interested to create a Timeline?, this is what you need.

16. Polldaddy - Create instant polls and expose it on your blog.

17. Plaxo - Let your visitors access their address books from your site.

18. Astore - Create a min store of amazon products and gets a commission when someone buys a product through it.

19. Hellobar - Add a sticky and fixed official bar at the top of your blog.

20. Disqus - Add an official commenting system on your blog.

21. Intensedebate - Another fully equipped commenting system for your blog.

22. LinkWithin - Related posts widget for your blog.

23. Addthis - Grab a beautiful social sharing widget for your blog.

24. Sharethis - Grab a smooth social sharing widget for your blog.

25. 99counters - Place a widget on your blog that displays complete stats of your blog visitors.

26. Kissinsights - Add a beautiful widget on your blog to survey your blog visitors.

27. Livezilla - Add a live chat support feature on your blog to live chat with your blog visitors.

28. Fibox - A shoutbox widget for your blog  where your blog visitors can leave messages same like a  forum.

29. Blinkxlt - Embed a link to related videos directly into your blog.

30. nrelate - Another best related posts widget for blogger.

Change Home,Newer Post & Older Post to Page Naviagation

Be The First To Comment
Blogger_page_navigation
. There is no need to customising these links but if you are interested in blog designing and wants your blog to look more professional then obviously this tutorial is for you. Anyone can easily change these links to Numbered page navigation by going through this tutorial. If your blog having a large number of posts with large number of visitors then visitors on your site can reach to different posts easily. So lets to apply this tricks on the blog.

  1. Login to Blogger Dashboard.
  2. Go to Design /  Edit HTML.
  3. Click "Expand widget templates'.
  4. Download full template before making any changes in it .
 Blogger_degin_edir-html
  1. Find following piece of code in template.
 ]]></b:skin>

  1. Paste the following code just above it.
<!.. Plugins By Shahbaz Malik at http://internetricks4u.blogspot.com ..> 

#blog-pager-newer-link {display:none;}

#blog-pager-older-link { display:none; }

#blog-pager {display:none; } 

.showpageArea a{text-decoration:none;} 

 .showpageNum a {text-decoration:none;border: 1px solid #cccccc;margin:0 3px;padding:3px;} 

.showpageNum a:hover 
{border: 4px solid #cccccc;background-color:#cccccc;text-decoration:none;} 

.showpagePoint
 {color:#333;text-decoration:none;border: 1px solid #cccccc;background: #cccccc;margin:0 3px;padding:3px;} 

.showpageOf 
{text-decoration:none;padding:3px;margin: 0 3px 0 0;}
.showpage a 
{text-decoration:none;border: 1px solid #cccccc;padding:3px;} 

.showpage a:hover 
{text-decoration:none;}
.showpageNum a:link,.showpage a:link 
{text-decoration:none;color:#333333;}

  1. Find </body> in template and paste following code just above it.
<b:if cond='data:blog.pageType != &quot;item&quot;'><b:if cond='data:blog.pageType != &quot;static_page&quot;'><script type='text/javascript'>var pageCount=5;var displayPageNum=5;var upPageWord =&#39;Previous&#39;;var downPageWord =&#39;Next&#39;;                                                     </script>                                                                        <script src='http://blogger-page-navigation.googlecode.com/files/blogger-page-navi..js' type='text/javascript'/></b:if></b:if> 
  1. Finally save the template and see the result.

Note:Make Following Modification

  • pagecount=5 is the number of post per page.
  • displayPagenum=5 additional page navigation number that will be displayed on the page.


And if you liked this post, please consider sharing it. Thanks
 

© 2011 MoreForBlogger - Designed by Mukund | ToS | Privacy Policy | Sitemap

About Us | Contact Us | Write For Us