Showing posts with label Template Design. Show all posts

Top 30 Widgets For Blogger

Be The First To Comment


1. Previewit - Watch a thumbnail live preview of the link pointed out from your blog. Thumbnails appears on mouse hover on the outbound link.

2. Feedjit - Display Real time traffic data of your blog just in your blog sidebar.

3. Twitter Badge - Display a twitter badge on your blog.

4. Jaxtr - Allows your blog visitors to call your mobile number but your mobile number will be kept private.

5. 3Jam - Allows your blog visitors to send messages to your mobile phone without knowing your number.

6. Box storage - Allows your visitors to store data on box.com's storage service while staying on your blog.

7. Flixn - Displays a stream directly from your webcam so your blog visitors can always see what you are up to.

8. Showmyweather - A widget to Display weather stats of various countries.

9. TwentyFeet - A place to keep track of all your social stats and analytics.

10. ClockLink - A widget to show off time of various regions.

11. Skype - A widget that displays whether you are offline or online on Skype.

12. Feedcount - Show off the number of visitors to your blog.

13. Feedbuzz - Display headlines from your Rss Feed.

14. AnswerBox - A widget that allow users to search definition of a particular word and proudly powered by answers.com.

15. Timeline - interested to create a Timeline?, this is what you need.

16. Polldaddy - Create instant polls and expose it on your blog.

17. Plaxo - Let your visitors access their address books from your site.

18. Astore - Create a min store of amazon products and gets a commission when someone buys a product through it.

19. Hellobar - Add a sticky and fixed official bar at the top of your blog.

20. Disqus - Add an official commenting system on your blog.

21. Intensedebate - Another fully equipped commenting system for your blog.

22. LinkWithin - Related posts widget for your blog.

23. Addthis - Grab a beautiful social sharing widget for your blog.

24. Sharethis - Grab a smooth social sharing widget for your blog.

25. 99counters - Place a widget on your blog that displays complete stats of your blog visitors.

26. Kissinsights - Add a beautiful widget on your blog to survey your blog visitors.

27. Livezilla - Add a live chat support feature on your blog to live chat with your blog visitors.

28. Fibox - A shoutbox widget for your blog  where your blog visitors can leave messages same like a  forum.

29. Blinkxlt - Embed a link to related videos directly into your blog.

30. nrelate - Another best related posts widget for blogger.

Change Home,Newer Post & Older Post to Page Naviagation

Be The First To Comment
Blogger_page_navigation
. There is no need to customising these links but if you are interested in blog designing and wants your blog to look more professional then obviously this tutorial is for you. Anyone can easily change these links to Numbered page navigation by going through this tutorial. If your blog having a large number of posts with large number of visitors then visitors on your site can reach to different posts easily. So lets to apply this tricks on the blog.

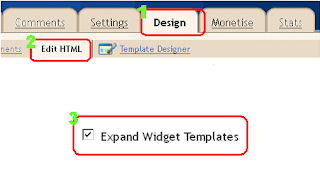
  1. Login to Blogger Dashboard.
  2. Go to Design /  Edit HTML.
  3. Click "Expand widget templates'.
  4. Download full template before making any changes in it .
 Blogger_degin_edir-html
  1. Find following piece of code in template.
 ]]></b:skin>

  1. Paste the following code just above it.
<!.. Plugins By Shahbaz Malik at http://internetricks4u.blogspot.com ..> 

#blog-pager-newer-link {display:none;}

#blog-pager-older-link { display:none; }

#blog-pager {display:none; } 

.showpageArea a{text-decoration:none;} 

 .showpageNum a {text-decoration:none;border: 1px solid #cccccc;margin:0 3px;padding:3px;} 

.showpageNum a:hover 
{border: 4px solid #cccccc;background-color:#cccccc;text-decoration:none;} 

.showpagePoint
 {color:#333;text-decoration:none;border: 1px solid #cccccc;background: #cccccc;margin:0 3px;padding:3px;} 

.showpageOf 
{text-decoration:none;padding:3px;margin: 0 3px 0 0;}
.showpage a 
{text-decoration:none;border: 1px solid #cccccc;padding:3px;} 

.showpage a:hover 
{text-decoration:none;}
.showpageNum a:link,.showpage a:link 
{text-decoration:none;color:#333333;}

  1. Find </body> in template and paste following code just above it.
<b:if cond='data:blog.pageType != &quot;item&quot;'><b:if cond='data:blog.pageType != &quot;static_page&quot;'><script type='text/javascript'>var pageCount=5;var displayPageNum=5;var upPageWord =&#39;Previous&#39;;var downPageWord =&#39;Next&#39;;                                                     </script>                                                                        <script src='http://blogger-page-navigation.googlecode.com/files/blogger-page-navi..js' type='text/javascript'/></b:if></b:if> 
  1. Finally save the template and see the result.

Note:Make Following Modification

  • pagecount=5 is the number of post per page.
  • displayPagenum=5 additional page navigation number that will be displayed on the page.


And if you liked this post, please consider sharing it. Thanks

How To Add Rounded Corner To The Popular Post

Be The First To Comment
modified+popular+post+widget
Now a days popular post is most useful widget as it shows most viewable posts of the blog in descending order of their priorities means, post which received maximum number of visitors will be on top position while the rest will be on decreasing order. The official look of the widget not gives up any impression to readers. So here you will learn to customize the official look of the widget as seen from above figure. We uses only CSS  to provide rounded corner around all the post. So lets see how this stuff will work?

The changes made by this tutorial can be seen by the above figure or in popular post widget of this blog. To get this changes in your popular post widget also


  1. Login to Blogger Dashboard.
  2. Go to Design /  Edit HTML.
  3. Click "Expand Widget Templates".
  4. Download the full template before making any changes in it .
  5. Search for following string in BT.
]]></b:skin>
  1. Paste the following code just above it.
Widget By Durai Sankar on http://moreforblogger.blogspot.com
.popular-posts ul li 
    {border:1px solid #1874CD;
  margin-bottom:5px;
 border-radius:10px;
   padding-left:5px;
 
    }

.popular-posts ul li:hover
   {
    text-decoration:none;
    border:1px solid #BFBFBF;
    }

Note:-Make Following Modification

  • To change the border color of normal position simply change #1874CD to any desired value you want.
  • To change the border color in hover state simply change #BFBFBF to any desired value ( The complete list of CSS color code are given here).


And if you liked this post, please consider sharing it. Thanks

How To Force Your Readers To Like Fan Page

Be The First To Comment
facebook_like_box
To get started with your small blog business or website the first point comes out in our mind is promotion of blog. Facebook gives opportunity to make a static brand page to promote online business, called Facebook fan page. The subscriber receives daily updates directly on their wall whenever blog's owner update status on blog.

The number of subscriber will then increase when readers on your blog click on Facebook fan page like button. Like button is a small widget placed at different position of blog, which force readers to like the page.

So the widget given below force your reader to like the page by popping out at a time when any reader visited on your blog.  

How To Add Facebook Popup Like Box

Why Use This Widget ?

  • Strongly force the readers to like the page
  • Can be repeatedly popup
  • Will not closed unless readers perform like action
So lets add this fantastic widget on blog

How To Add Popup Like Box In Blogger Blog

  1. In Blogger dashboard, Go to DesignPage Element.
  2. Click Add a gadget and then choose HTML /  JavaScript.
  3. Paste the following code in it.
<!-- http://moreforblogger.blogspot.in/  -->
<style>

#fblikepop
{background-color:#fff;display:none;position:fixed;top:200px;_position:absolute; /* hack for IE 6*/width:450px;border:10px solid #6F6F6F;z-index:200;-moz-border-radius: 9px;-webkit-border-radius: 9px;margin:0pt;padding:0pt;color:#333333;text-align:left;font-family:arial,sans-serif;font-size:13px;}

#fblikepop body{background:#fff none repeat scroll 0%;line-height:1;margin:0pt;height:100%;}.fbflush{cursor: pointer;font-size:11px !important;color:#FFF !important;text-decoration:none !important;border:0 !important;}

#fblikebg{display:none;position:fixed;_position:absolute; /* hack for IE 6*/height:100%;width:100%;top:0;left:0;background:#000000;z-index:100;}#fblikepop #closeable{float:right;margin:7px 15px 0 0;}

#fblikepop h1{background:#6D84B4 none repeat scroll 0 0;border-top:1px solid #3B5998;border-left:1px solid #3B5998;border-right:1px solid #3B5998;color:#FFFFFF !important;font-size:14px !important;font-weight:normal !important;padding:5px !important;margin:0 !important;font-family:"Lucida Sans Unicode", "Lucida Grande", sans-serif !important;}

#fblikepop #actionHolder
{height:30px;overflow:hidden;}#fblikepop #buttonArea{background:#F2F2F2;border-top:1px solid #CCCCCC;padding:10px;min-height:50px;}#fblikepop #buttonArea a{color:#999999 !important;text-decoration:none !important;border:0 !important;font-size:10px !important;}

#fblikepop #buttonArea a:hover
{color:#333 !important;text-decoration:none !important;border:0 !important;}#fblikepop #popupMessage{font-size:12px !important;font-weight:normal !important;line-height:22px;padding:8px;background:#fff !important;}

#fblikepop #counter-display
{float:right;font-size:11px !important;font-weight:normal !important;margin:5px 0 0 0;text-align:right;line-height:16px;}
</style>

<script type="text/javascript" src="http://connect.facebook.net/en_US/all.js#xfbml=1"></script>
<script type="text/javascript">
//<![CDATA[
 kakinetworkdotcom01username="moreforblogger",
 kakinetworkdotcom01title="Join us at Facebook!",
 kakinetworkdotcom01skin="01",
 kakinetworkdotcom01time="20",
 kakinetworkdotcom01wait="5",
 kakinetworkdotcom01lang="en"
//]]>
</script>
<script type="text/javascript" src="http://kakinetworkdotcom.googlecode.com/svn/01/files/likeboxfbfanpro.js"></script>
<script type="text/javascript">
//<![CDATA[
 $(document).ready(function(){$().kakinetworkdotcom({ closeable: true });});
//]]>
</script>
<!-- http://moreforblogger.blogspot.in/  -->

Modification

  • Replace moreforblogger with your Facebook fan page username
  • Join us at Facebook is title of widget
  • How long like box will display on blog is define by 20. ( means 20 second ) after 20 seconds it will close automatically
  • 5 define the time in minute after which it will popup again.


And if you liked this post, please consider sharing it. Thanks!

How to Choose a New Blog Template

Be The First To Comment
Blog Template plays great role in your blogging career. Even though you have great visitors and you have an ugly template, your reputation on your first time visitors goes down and thus your credibility level decreases, and your power to control your visitors decrease. So you need to choose an ideal template that best match your blogging niche in order to get better results. Let us discover how we can choose better theme for our blog.
Choose Template
First thing you need to consider is design. This plays great role as first impression of your blog deals with your design. When a visitor first lands your blog, first thing that is noticed is design and layout before your content is read. So you need to keep your blogs look neat and beautiful as confusing blog templates are hated by the visitors. The template should be a simple one which helps the visitors to take a look of every content in a blog.
Second thing you need to notice is your blog template should be Social Bookmarking Friendly. These days people get a lot of traffic from social Networking and Bookmarking sites, so while choosing a template you should choose the one which already has a place for Social sites like Twitter, Facebook and all because adding them later may make your blog look confusing. So you may consider template that gives place for these thing.
Next thing you need to consider is Font and Color Combination which means you need to check the color of your theme. You need to check everything including hover links ,visited links,simple links and fonts. Template with proper color combination gives an ideal look.
If you are adsense user, you shall need to check if your blogs is ads Friendly or not. Ads friendly in the sense that whether they posses a place for ads placement or not. It would be better if you have a place for ads in your blogs. I would always prefer an adsense ready template because it would not consume my times for placing ads later. This will help you to save your time and prevents your blog to look ugly later when you add ads.
Other thing you need to check is Browser Compablity. Since your visitors can be using different browsers, you need to check the demo of the theme with all the browsers you can before you install the theme, making sure that the template is browser compatible so that you can control all your visitors no matter which browsers they use.
Last but not the least, you need to check the loading Speed of your template. Never choose the template with higher loading times as they annoys both Google and your visitors.


And if you liked this post, please consider sharing it. Thanks !

Facebook Like Button For Blogger

Be The First To Comment
Facebook Like Button For Blogger
This Tutorial will help you in adding a Facebook Like Button For Blogger. Facebook has come up with a new set of Social plugins which enable you to provide engaging social experiences to your users with just a line of HTML. The Facebook Like Button is One of them. You can see a demo of the like button on this page. The Facebook like button will allow your readers to quickly share your posts with their Facebook Friends. You can also get to know how many people liked your Blog Post .This tutorial will teach you to add a Facebook Like button for Blogger


How to Add the Facebook Like Button Below every Post

1. First Generate the Facebook code using the options below. (Code will be updated with these details)

Button Type
Text on Button
Show Send Button
Color Scheme
Font
Float
Location of the Button
Display
<div>
<b:if cond='data:post.isFirstPost'> 
<script>(function(d){
  var js, id = 'facebook-jssdk'; if (d.getElementById(id)) {return;}
  js = d.createElement('script'); js.id = id; js.async = true;
  js.src = "//connect.facebook.net/en_US/all.js#xfbml=1";
  d.getElementsByTagName('head')[0].appendChild(js);
}(document));</script>

</b:if> 
<fb:like expr:href="data:post.canonicalUrl" layout='standard' send='true' show_faces='false' font="arial" action="like" colorscheme="light"></fb:like>
</div>
2. Copy the Above code. Login to your Blogger Account and go to Design > Edit HTML and click on the check box which says “Expand Widget Templates
3. Look for <data:post.body/> and immediately below that place the copied code.
4.Next you have to add the fb namespace to your template tag.Your template should have the specification for the fb tag that you have used. The following namespace declaration will take care of that. To declare the namespace, find
<html
and change it to
<html xmlns:fb="https://www.facebook.com/2008/fbml"
The following screenshot will help you out.


image              

This is necessary for all FBML widgets using the fb tag.  So if you have already added the namespace while adding some other FB plugin, then you can skip this.
4. Now Save the template and you should see the Like Button near each of your posts. You are done :)

Hide/Show Widgets/Gadgets in Home/post/static/archive pages in Blogger

Be The First To Comment
As you have probably observed, all the widgets/gadgets you add to your blog, will be displayed in all the pages by default, including your homepage too. And if you haven't heard about this already, Adsense can disable your account only for the reason you've put ad units on the content of your contact or privacy policy pages. Isn't that ridiculous? Well, if you ask me, the answer would be: yes and no. First of all, lots of widgets can make a blog/site to look unprofessional, increasing page loading time, therefore visitors will lose their patience.

To hide (or show) widgets in particular posts, static pages, homepage or archive pages, you can use conditional tags.

1. First of all, go to Blogger's Dashboard >> Design >> Page Elements and give a name for the HTML/Javascript gadgets you have already added. Doing this it will be easy for you to identify the widgets in your blogger template. Give it a unique title so that it does not match with any of the titles of other widgets added.

2. Then go to Dashboard >> Design >> Edit HTML and check the "Expand Widget Templates" box.

3. Find your widget in the HTML by using Ctrl+F and entering the widget's name in the search box. Let's say i have given the title for my widget as "Recent Posts". After searching you will find the below snippets:


<b:widget id='HTML1' locked='false' title='Recent Posts' type='HTML'>
<b:includable id='main'>
<!-- only display title if it's non-empty -->
<b:if cond='data:title != ""'>
<h2 class='title'><data:title/></h2>
</b:if>
<div class='widget-content'>
<data:content/>
</div>

<b:include name='quickedit'/>
</b:includable>
</b:widget>  

This code represents the widget/gadget that you have added in the Page Elements location. All you have to do is to add the following conditional tags marked with red just below and above to hide the widget from specific pages or posts in Blogger. Let's see some examples:

To show the widget only in Homepage:

<b:widget id='HTML1' locked='false' title='Recent Posts' type='HTML'>
<b:includable id='main'>
<b:if cond='data:blog.url == data:blog.homepageUrl'>
<!-- only display title if it's non-empty -->
<b:if cond='data:title != ""'>
<h2 class='title'><data:title/></h2>
</b:if>
<div class='widget-content'>
<data:content/>
</div>

<b:include name='quickedit'/>
</b:if>
</b:includable>
</b:widget>

To show Blogger widget only in post pages 

<b:widget id='HTML1' locked='false' title='Recent Posts' type='HTML'>
<b:includable id='main'>
<b:if cond='data:blog.pageType == "item"'>
<!-- only display title if it's non-empty -->
<b:if cond='data:title != ""'>
<h2 class='title'><data:title/></h2>
</b:if>
<div class='widget-content'>
<data:content/>
</div>

<b:include name='quickedit'/>
</b:if>
</b:includable>
</b:widget>

To show the widget in a specific page
 
<b:widget id='HTML1' locked='false' title='Recent Posts' type='HTML'>
<b:includable id='main'>
<b:if cond='data:blog.url == "URL of the page"'>
<!-- only display title if it's non-empty -->
<b:if cond='data:title != ""'>
<h2 class='title'><data:title/></h2>
</b:if>
<div class='widget-content'>
<data:content/>
</div>

<b:include name='quickedit'/>
</b:if>
</b:includable>
</b:widget>

Note: Replace URL of the page with the address of the page in which you want the widget to appear

To hide a widget only in a particular page

<b:widget id='HTML1' locked='false' title='Recent Posts' type='HTML'>
<b:includable id='main'>
<b:if cond='data:blog.url != "URL of the page"'>
<!-- only display title if it's non-empty -->
<b:if cond='data:title != ""'>
<h2 class='title'><data:title/></h2>
</b:if>
<div class='widget-content'>
<data:content/>
</div>

<b:include name='quickedit'/>
</b:if>
</b:includable>
</b:widget> 

To show widgets only in static pages

<b:widget id='HTML1' locked='false' title='Recent Posts' type='HTML'>
<b:includable id='main'>
<b:if cond='data:blog.pageType == "static_page"'>
<!-- only display title if it's non-empty -->
<b:if cond='data:title != ""'>
<h2 class='title'><data:title/></h2>
</b:if>
<div class='widget-content'>
<data:content/>
</div>

<b:include name='quickedit'/>
</b:if>
</b:includable>
</b:widget> 

To hide widgets in Static Pages

<b:widget id='HTML1' locked='false' title='Recent Posts' type='HTML'>
<b:includable id='main'>
<b:if cond='data:blog.pageType != "static_page"'>
<!-- only display title if it's non-empty -->
<b:if cond='data:title != ""'>
<h2 class='title'><data:title/></h2>
</b:if>
<div class='widget-content'>
<data:content/>
</div>

<b:include name='quickedit'/>
</b:if>
</b:includable>
</b:widget> 

To show widgets only in Archive Pages

 <b:widget id='HTML1' locked='false' title='Recent Posts' type='HTML'>
<b:includable id='main'>
<b:if cond='data:blog.pageType == "archive"'>
<!-- only display title if it's non-empty -->
<b:if cond='data:title != ""'>
<h2 class='title'><data:title/></h2>
</b:if>
<div class='widget-content'>
<data:content/>
</div>

<b:include name='quickedit'/>
</b:if>
</b:includable>
</b:widget> 

After you have added the conditional tags, Save Template and view your blog.


And if you liked this post, please consider sharing it. Thanks!
 

© 2011 MoreForBlogger - Designed by Mukund | ToS | Privacy Policy | Sitemap

About Us | Contact Us | Write For Us